All posts by Angelica

I’m a saved-by-faith-alone Christian, Texan-born-and-bred, stay-at-home mom that loves to craft and help people. I like to learn more so I can share with others.

The Red Elephant & Silhouette Studio V3 – Part A

The week started off with on a high note.  The new products had been posted on the previous Friday and since learning that we would have to upgrade to use the new mats, most were trying to be optimistic about it.  The momentum kept up during the first impressions, but then, while digging a little deeper, problems started coming up.  The party stopped altogether once the realization hit that some SVG’s could not be manipulated as they once were–at least, not without having to use a workaround.  I figured out you could re-save the SVG’s in Inkscape or Make-The-Cut first before importing to make it work like it does in V2.  I also found out what the difference was between the files.  In the SVG directly imported to V3, each color had its own layer while also being in another layer.  Re-saving in MTC or Inkscape puts all the colors in one layer.

I was going to post my first impressions of V3 with many good comments about it, but the layer problem has taken all the attention.  Now we have this pink elephant in the room that’s turned red because it’s an embarrassment that they would release layers still being broken.  This is a designer edition only feature!  This is one of the reasons why they say you should upgrade!  Layers are so broken that even basic users are affected by it, but they can’t see the layers window to know what is going on.

I spent on and off yesterday actively working on and passively thinking about this problem.  It wasn’t until late in the night that I had been going about it all wrong.  I already knew the solution from past experiences.  Instead, I went all gung-ho and tried multiple converters and attempted to use the command line to batch convert.  It was a waste of time because they don’t touch what is wrong.

It’s the layers.

Back when I was trying to get along without the designer edition, I found a SVG to DXF plugin and to convert an SVG involved ungrouping the layers before saving.  Last night, I realized that’s the key to the workaround.


So, what’s going on with the layers?

I’ll be demonstrating how the layers currently work through how it currently is and the workaround.  I have used only one SVG for all the tests, a girl from Strawberry Kisses, a recent freebie from Lettering Delights.

001
1) What you start out with
002
2) You drag and drop your SVG into V3.

Workaround #1

003
3) Workaround Method #1: You try to cut and paste the imported SVG to fix the layering issue and it moves the groups out of the layers into the main layer, but does not delete the empty layers.

Workaround #2

004
4) Workaround Method #2: You start over and this time to try to ungroup the SVG after you drag and drop it into the program and save it to the library hoping it would only save the only necessary layer. However, when you add the new library version to a new file, all the colors have their own layers!

Workaround #3

005
5) Workaround Method #3: Creating a new SVG through opening the file and Saving As in Inkscape makes it only one layer and it starts out as grouped.

Workaround #4

006
6) Workaround Method #4: Trying the same technique in Make-The-Cut as Inkscape, it renders similar results. Strangely it has two layers to Inkscape’s one and it is also grouped initially.

Workaround #5

007
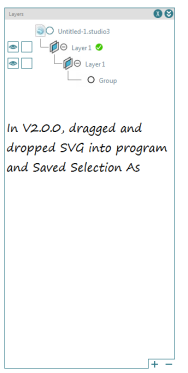
7) Workaround Method #5: V2.0.0 allows you to save in SVG if you have designer edition. Dragging and dropping the SVG into V2.0.0 and Saving Selection As, then dragging and dropping the new file into V3 lets you see that it only has one layer and is grouped.


To be continued.. In the next part, I’ll be explaining how to do my preferred method and you’ll be organizing your collection at the same time if you follow along!

Locate Calibration For Your Silhouette Cameo or Portrait In Silhouette Studio V3

AngeliCutsDOTcom_silstudioV3_wheretofindcalibrateIn Silhouette Studio V3, the ability to calibrate your machine’s Print-and-Cut accuracy has been moved out of sight!  I had to look in the manual to find out where they hid it.  I was flabbergasted by the answer and now you can be too!

  1. Turn on your Silhouette Cameo or Portrait.
  2. Open Silhouette Studio V3.
  3. Do one of these three things:
    1. Click the icon at the top most right called, “Send to Silhouette”.  It looks like a Cameo with some material sticking out that has a sideways A on it.  It turns into a downward arrow after you have clicked it.
    2. From the menu bar, go to Silhouette->Send to Silhouette
    3. Use the keyboard shortcut CTRL+L
  4. In the box that lists your machine, right click and a list of options will come up: Release Cameo (or Portrait), Connect to Cameo (or Portrait), Calibration, Distance Adjustment, Manual Registration, and Automatic Registration.
  5. Choose Calibration and it will come up with the Calibration test page and settings.  It looks stylistically a little different from V2, but the functionality is the same.  You can now proceed with my previous tutorial on how to calibrate your machine!

AngeliCutsDOTcom_silstudioV3_calibration

Tutorial: Calibrating Your Silhouette Cameo or Portrait For Silhouette Studio V2/V3

Last Updated: August 6th, 2014

The subtitle to this should be:  A Cautionary Tale!  How I Broke My Cameo, But Then Fixed It.

You see, I have lots of Print-and-Cut projects that I want to do, but I wanted to calibrate my Cameo to ensure that the cuts were as accurate as possible.  I headed over to the official website for support on how to do the calibration.  I didn’t understand the instructions very well, but I forged on anyway.  I shouldn’t have!  Long story short, I ended up making my Cameo cut parallelograms instead of squares, but I fixed it.  So, of course, now I have to share my newly found knowledge to help you not make the same mistakes as me!


 Before You Begin

You should calibrate when:
  1. You have made sure you’ve done all other things necessary for Print-and-Cut correctly.
    • Registration marks are checked to show on your paper.
    • Your design is not in the areas that cannot be cut in during a Print-and-Cut.
    • Your printer has printed accurately what is on the screen.  (Some HP printers, in particular, are known to give inaccurate Print-and-Cuts.)
    • You’ve placed your paper onto the cutting mat the same way as shown in Silhouette Studio.
    • You’ve loaded the cutting mat with proper alignment to the rollers and chose the correct load option.
    • Your Cameo is in a well lit area.  The machine uses what is called an “optical eye” to see the registration marks.  (You may need to put a lamp over the Cameo to ensure enough lighting.)
  2. The distance that the cut is off is the same across the paper.  If it is 2cm off on the far left side, but only 1cm on the far right side, Silhouette America recommends that you don’t calibrate.

If you meet these two requirements, you may proceed to the instructions!


WARNING:  Do not attempt to do this while you are distracted.  Do not attempt if you’re not willing to read all the instructions before starting.  You can break your machine’s ability to do Print-and-Cuts if not careful!!


AngeliCutsDOTcom_silhouettestudiocalibration
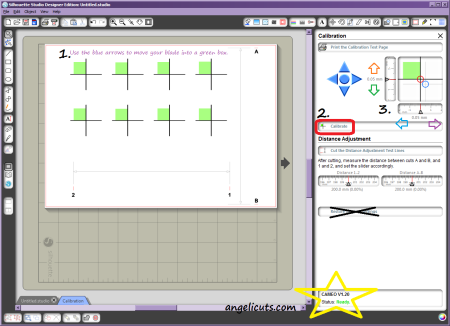
I have taken a screenshot of the calibration window and made some notes on it and symbols that I will refer to in the instructions.  This screenshot was taken in V2.8.16, but V3.1.417 looks very similar.

Part 1

  1. Turn your Cameo or Portrait on.
  2. Open Silhouette Studio.
  3. Go to File->Cut Settings.  Lower your thickness to make shallow cuts instead of cutting all the way through your card stock.*
    • *I normally have a thickness of 15 for my card stock, so I lowered the thickness down to 10.  This will make the paper easier to remove later and allow you to make double cuts.
  4. Go to File->Calibration.  What I have shown in the screenshot will appear.
    • ***Silhouette Studio V3 users will need to access Calibration this way!***
  5. Print the Calibration Test Page with your card stock.
  6. Place the printed out test page on your cutting mat as shown in Silhouette Studio.
  7. On your Cameo/Portrait, use the arrow keys to choose Load Cutting Mat, align your cutting mat against the machine’s rollers, and press the Enter key.

Part 2

  1. In Silhouette Studio, use the blue arrows to move your blade to the inside of the first green box.  (I have marked the first one with a 1. in my screenshot.)
  2. Click Calibrate in Silhouette Studio and wait for it to finish reading the registration marks and cutting the two cut lines.  (Calibrate is labeled with a 2. and a red outline.)
    • Watch the area that I have starred in the screenshot.  Notice that when you press “Calibrate”, it goes from “Ready” to “Working”.  This is important.
  3. Unload your cutting mat from your Cameo/Portrait.

Part 3

  1. Starting with the horizontal test line, use a ruler to measure the distance in millimeters between the cut line to the the middle of the test line and write it down.
    • The calibration will accept as small as a .05 millimeter change for V2.
    • If the cut line is closer to the orange arrow in my screenshot, your measurement will be positive.
    • If the cut line is closer to the green arrow in my screenshot, your measurement will be negative.
  2. Now with the vertical test line, use a ruler to measure the distance in millimeters between the cut line to the the middle of the test line and write it down.
    • The calibration will accept as small as a .05 millimeter change for V2.
    • If the cut line is closer to the blue arrow in my screenshot, your measurement will be positive.
    • If the cut line is closer to the purple arrow in my screenshot, your measurement will be negative.
  3. Reload your cutting mat into your Cameo/Portrait.

Part 4

  1. In Silhouette Studio, use the blue arrows to move your blade to the next green box.
  2. Click Calibrate and after the cut is complete, click and drag the arrows in the area of Silhouette Studio that I have marked as 3. in my screenshot.
    • This is time sensitive!  You need to do this while the Status is still “Working”!
    • If Silhouette Studio reverts your adjustment back to what it was before, it was not accepted and so your calibration has not been changed.
      • Wait until the Status says “Ready” and try to Calibrate again.
        • Move your blade to a new green box first, if needed.
  3. Once Silhouette Studio has accepted your adjustments, you can press the X to exit the calibration.
  4.  Unload your cutting mat from your Cameo/Portrait.

Did It Work?

You should do a test Print-and-Cut to try out your new calibration settings.  You can use the one that I made.  Download it here.

You’re Done!

If you have done the calibration correctly, the Print-and-Cut test should be perfect or very, very close!

LD’s $1 SVG Sale Ending Soon! My Picks & Free Collection with $15 Purchase

ld-merrykissmas-saleHave you shopped the sale yet?  It’s ending on July 31st 11:59PM Mountain Standard Time!

Lettering Delights has only opened the “SVG Vault”–containing the SVG’s they retired after they came up with Cut Its–only once before, to my recollection.  When the sale is over, they take them off the site.*  Some designs have been converted to Cut Its, but many still haven’t.  This is the only way to get these files that are ready for cutting.  If you buy the graphic version later on, you have to trace them yourself.

*They can still be accessed if you have bought them from the Your Library section of the site, so you can download them again.

AngeliCutsDOTcom-ld-merrykissmass-sale-mypicksThis screenshot shows the SVG sets that I choose, plus the Monogram Thin Font set that I have been wanting for a while.  I used the coupon code “MerryKissmas” to make the final price $15.  The $15 was intentional, because now I have access to the Get Happy collection!  You can read more about this promotion here.

Here’s what I bought from the sale:

  1. Weather Girl
  2. Weather Boy
  3. Bento Box
  4. Oishii
  5. Ninja Kicks
  6. Something Fishy
  7. Felt Owl Right
  8. Gingerbread Cookie
  9. Valentine Mailbox
  10. Valentine Mail Drop Box

Oh, and remember to grab your monthly freebies while you’re there!

Tutorial: Install Multiple Versions of Silhouette Studio on One Computer

Updated August 5th, 2014

AngeliCutsDOTcom_multipleversionsofSSinstalledI recently had to reinstall Windows 7 64-bit, so I thought I would write out what I did to install multiple versions of Silhouette Studio on the same computer.  Special steps are needed to keep the different versions; otherwise the newer versions of Silhouette Studio will delete the older ones.

Silhouette America has the legacy version 2.9.45 and the current version, 3.0.531 3.1.417, is available on their website here.  If you still have the CD that came with your Cameo, it should have version 2.0.0 on it.  The Portrait CD should have a later version of V2 on it.

Part 1

  1. If you have Silhouette Studio (any version) installed, backup these two folders*:
    1. C:\ProgramData\com.aspexsoftware.Silhouette_Studio.8
    2. C:\ProgramData\com.aspexsoftware.Silhouette_Studio.license
      • *You may need to set hidden files to be shown to see the “ProgramData” folder by clicking Organize in Windows Explorer and choosing “Folder and Search Options”.  In the View tab, click the circle for “Show hidden files, folders, and drives”, click Apply, and then OK.
        • Alternatively, you may find the folders in the C:\Documents and Settings\All Users\Application Data\ folder instead.
          • If you still can’t find the folder, do a file search for “com.aspexsoftware.Silhouette_Studio” in your main drive (typically “C”).
  2. Uninstall the existing Silhouette Studio.
  3. Restart your computer.

Part 2

  1. Install the oldest version of Silhouette Studio that you want.
    1. During the install, change the folder destination by adding the version number.  Do not put a space between “Studio” and the version number. Examples:
      • C:\Program Files (x86)\Silhouette StudioV2.0.0
        OR
      • C:\Program Files (x86)\Silhouette StudioV2.9.45
    2. Uncheck “Run Program” and exit the installer when it is finished.
  2. After the installation is complete, go to the folder in Windows Explorer and add a space to the folder name. Examples:
    • C:\Program Files (x86)\Silhouette Studio V2.0.0
      OR
    • C:\Program Files (x86)\Silhouette Studio V2.9.45
  3. Rename the Silhouette Studio.exe by adding the version number. Examples:
    • Silhouette Studio V2.0.0.exe
      OR
    • Silhouette Studio V2.9.45.exe
  4. Make a shortcut on your desktop to this version by right-clicking on the executable and choose Send to->Desktop (Create Shortcut).
  5. Install the next version by repeating 1-4 with the appropriate version number for the naming.

Part 3

  1. Restore your backups back to the appropriate folder listed in part 1.
  2. Optional step: Disable “Check for Updates” in the software’s settings.*
    • *Every version will be affected by this change, so you only have to do it once!
  3. Optional step: Clean up the shortcut names on your desktop and change the icons to help differentiate between the versions.

You’re Done!

All versions should now work and if you have already registered your Designer Edition, they will all have Designer Edition enabled!*

  • *In my experience, Silhouette Studio V3 somehow breaks the license files.  If you open V3 and then later open V1 or V2, you will not have Designer Edition enabled.  The only fix I currently know for this is to copy your backup back over after using V3.  I will be looking into a true fix for this.
    As of August 4th, 2014, this is no longer true.  The newest release of Silhouette Studio V3.1.417 has fixed this issue.  If you registered your designer edition in V2, it will show up in V3.

Want to uninstall one of the versions?
If you look in Program and Features in the Control Panel, you’ll notice only one version of Silhouette Studio is shown as installed.  It is the most recent one you’ve installed.  To uninstall one of the other versions, delete the folder from Program Files x86 and the corresponding shortcut from the desktop.